How to Configure OSPF Single Area
 Suresh Thapa
In this article, we will discuss how to configure OSPF single area.
For this configuration, I am using Eve-NG and Cisco vIOS router.
Steps for configuration.
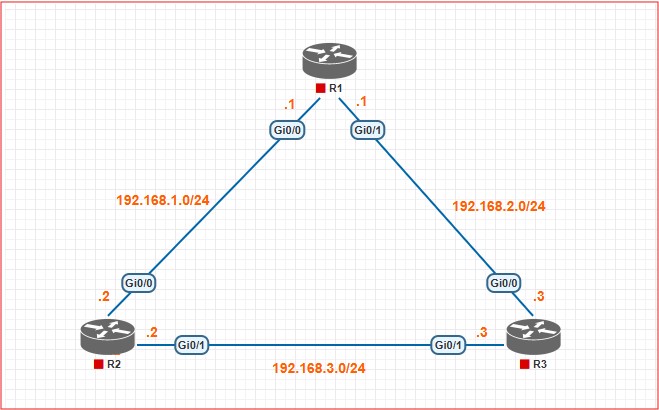
- Setup topology on Eve-ng and configure IP addresses showing in the diagram.
- Configure following loopbacks 0 on routers.
- R1 – 1.1.1.1/24
- R2 – 2.2.2.2/24
- R3 – 3.3.3.3/24
- Configure OSPF on all router with process-id 1 area 0.
- R1: Use area 0 and use 2 network statements to advertise all networks.
- R2: Use area 0 and use 1 network statement to advertise all networks.
- R3: use area 0 and use 3 network statements to advertise all networks.
Topology
Configurations of OSPF Single Area.
R1 configuration.
Configure interfaces, loopback and use 2 network statement.
R1(config)#router ospf 1
R1(config-router)#network 1.1.1.1 0.0.0.255 area 0
R1(config-router)#network 192.168.0.0 0.0.255.255 area 0
R2 configuration.
Configure interfaces, loopback and use 1 network statement.
R2(config)#router ospf 1
R2(config-router)#network 0.0.0.0 255.255.255.255 area 0
R3 configuration.
Configure interfaces, loopback and use 3 network statement.
R3(config)#router ospf 1
R3(config-router)#network 192.168.3.0 0.0.0.255 area 0
R3(config-router)#network 192.168.3.0 0.0.0.255 area 0
R3(config-router)#network 3.3.3.3 0.0.0.255 area 0
After the OSPF configuration verify all neighbors and routes on all routers.
Use show ip ospf neighbor for check neighbors.
Use show ip route for check all routes.
Check OSPF neighbor relationships and routing tables.
Router# show ip ospf neighbor
Router# show ip route ospf
Tags:
Cisco
Network
OSPF